Cleveland High Power SSF Upgrade
9/23/25
Disclaimer: Modifications are done at your own risk. Arkpins.com is not responsible for any damage, injury, or loss resulting from the use of this content.
SAFETY TIPS
You will be handling bare electrical components so consider the following:
Disconnect the cabinet from power.
Do not wear any metal jewelry on your hands.
Maintain an organized area away from the workspace to store screws, components, and wiring
Wear a grounding strap or discharge yourself frequently by touching a grounded metal object before handling bare electronic components.
Do not store tools on the playfield railing or support beams. You don’t want a falling screwdriver to fall and stab a component.
If this is your first time opening the cabinet, take lots of pictures for reference.
This blog contains Amazon Affiliate links, if you like what you see, consider supporting my journey.
NOTE1: This post is a little out of order since I performed a complete audio and reskin upgrade prior to this SSF blog entry. What you see in the pictures will make more sense if you read the Audio Upgrade and Cabinet Reskin posts first which is still currently in progress as of 9/22/25. They will be out very soon.
NOTE2: This is just a documentation of my experience trying to upgrade my ATGames Legends 4K pinball machine. I’m just a dude who likes to tinker, and I make a LOT of mistakes. If you see something wonky, let me know in the comments. This isn’t a complete how-to, it’s just a general guide to the process.
UPDATE: 9/27/25 After extended play I started to have issues with the audio dropping out. It seems fairly consistent after 30 minutes. I now suggest that you modify your cabinet with some kind of active ventilation to help the regulate the internal temperature. Here is how I installed fans in the 4KP cabinet. LINK HERE.
UPDATE: 11/3/25 This is a paste from my fan installation blog entry from 10/1 that’s relevant here. I’ve been in contact with the Cleveland group and discovered that the subwoofer that I’m using features 2-ohm voice coils which isn’t favorable to the amp’s design and causing the built-in protection to trip. In fact, you can damage the subwoofer amp circuitry if you run it hard enough. What I ended up doing was rewiring the dual voice-coils in series which increased the impedance to 4-ohm which made the connection stable. I was able to run the subwoofer w/o the fans for 45-minutes and didn’t experience any audio anomalies. Regardless, adding a fan to the 4KP is still a good idea for the longevity of the electronic inside. Heat is the enemy!
THE SHORT
It’s possible to upgrade your ATGames Legends 4K Pinball’s factory SSF kit with the Cleveland High Power SSF Kit.
If you own a Legends 4K Pinball without the SSF Kit SSF471 $499.99, you can install the Cleveland High Power SSF Kit $399, currently on sale for $355 as of 9/22/25. *I haven’t tested this but I don’t see why it wouldn’t work.
WHAT
The Cleveland High Power SSF Kit features the following:
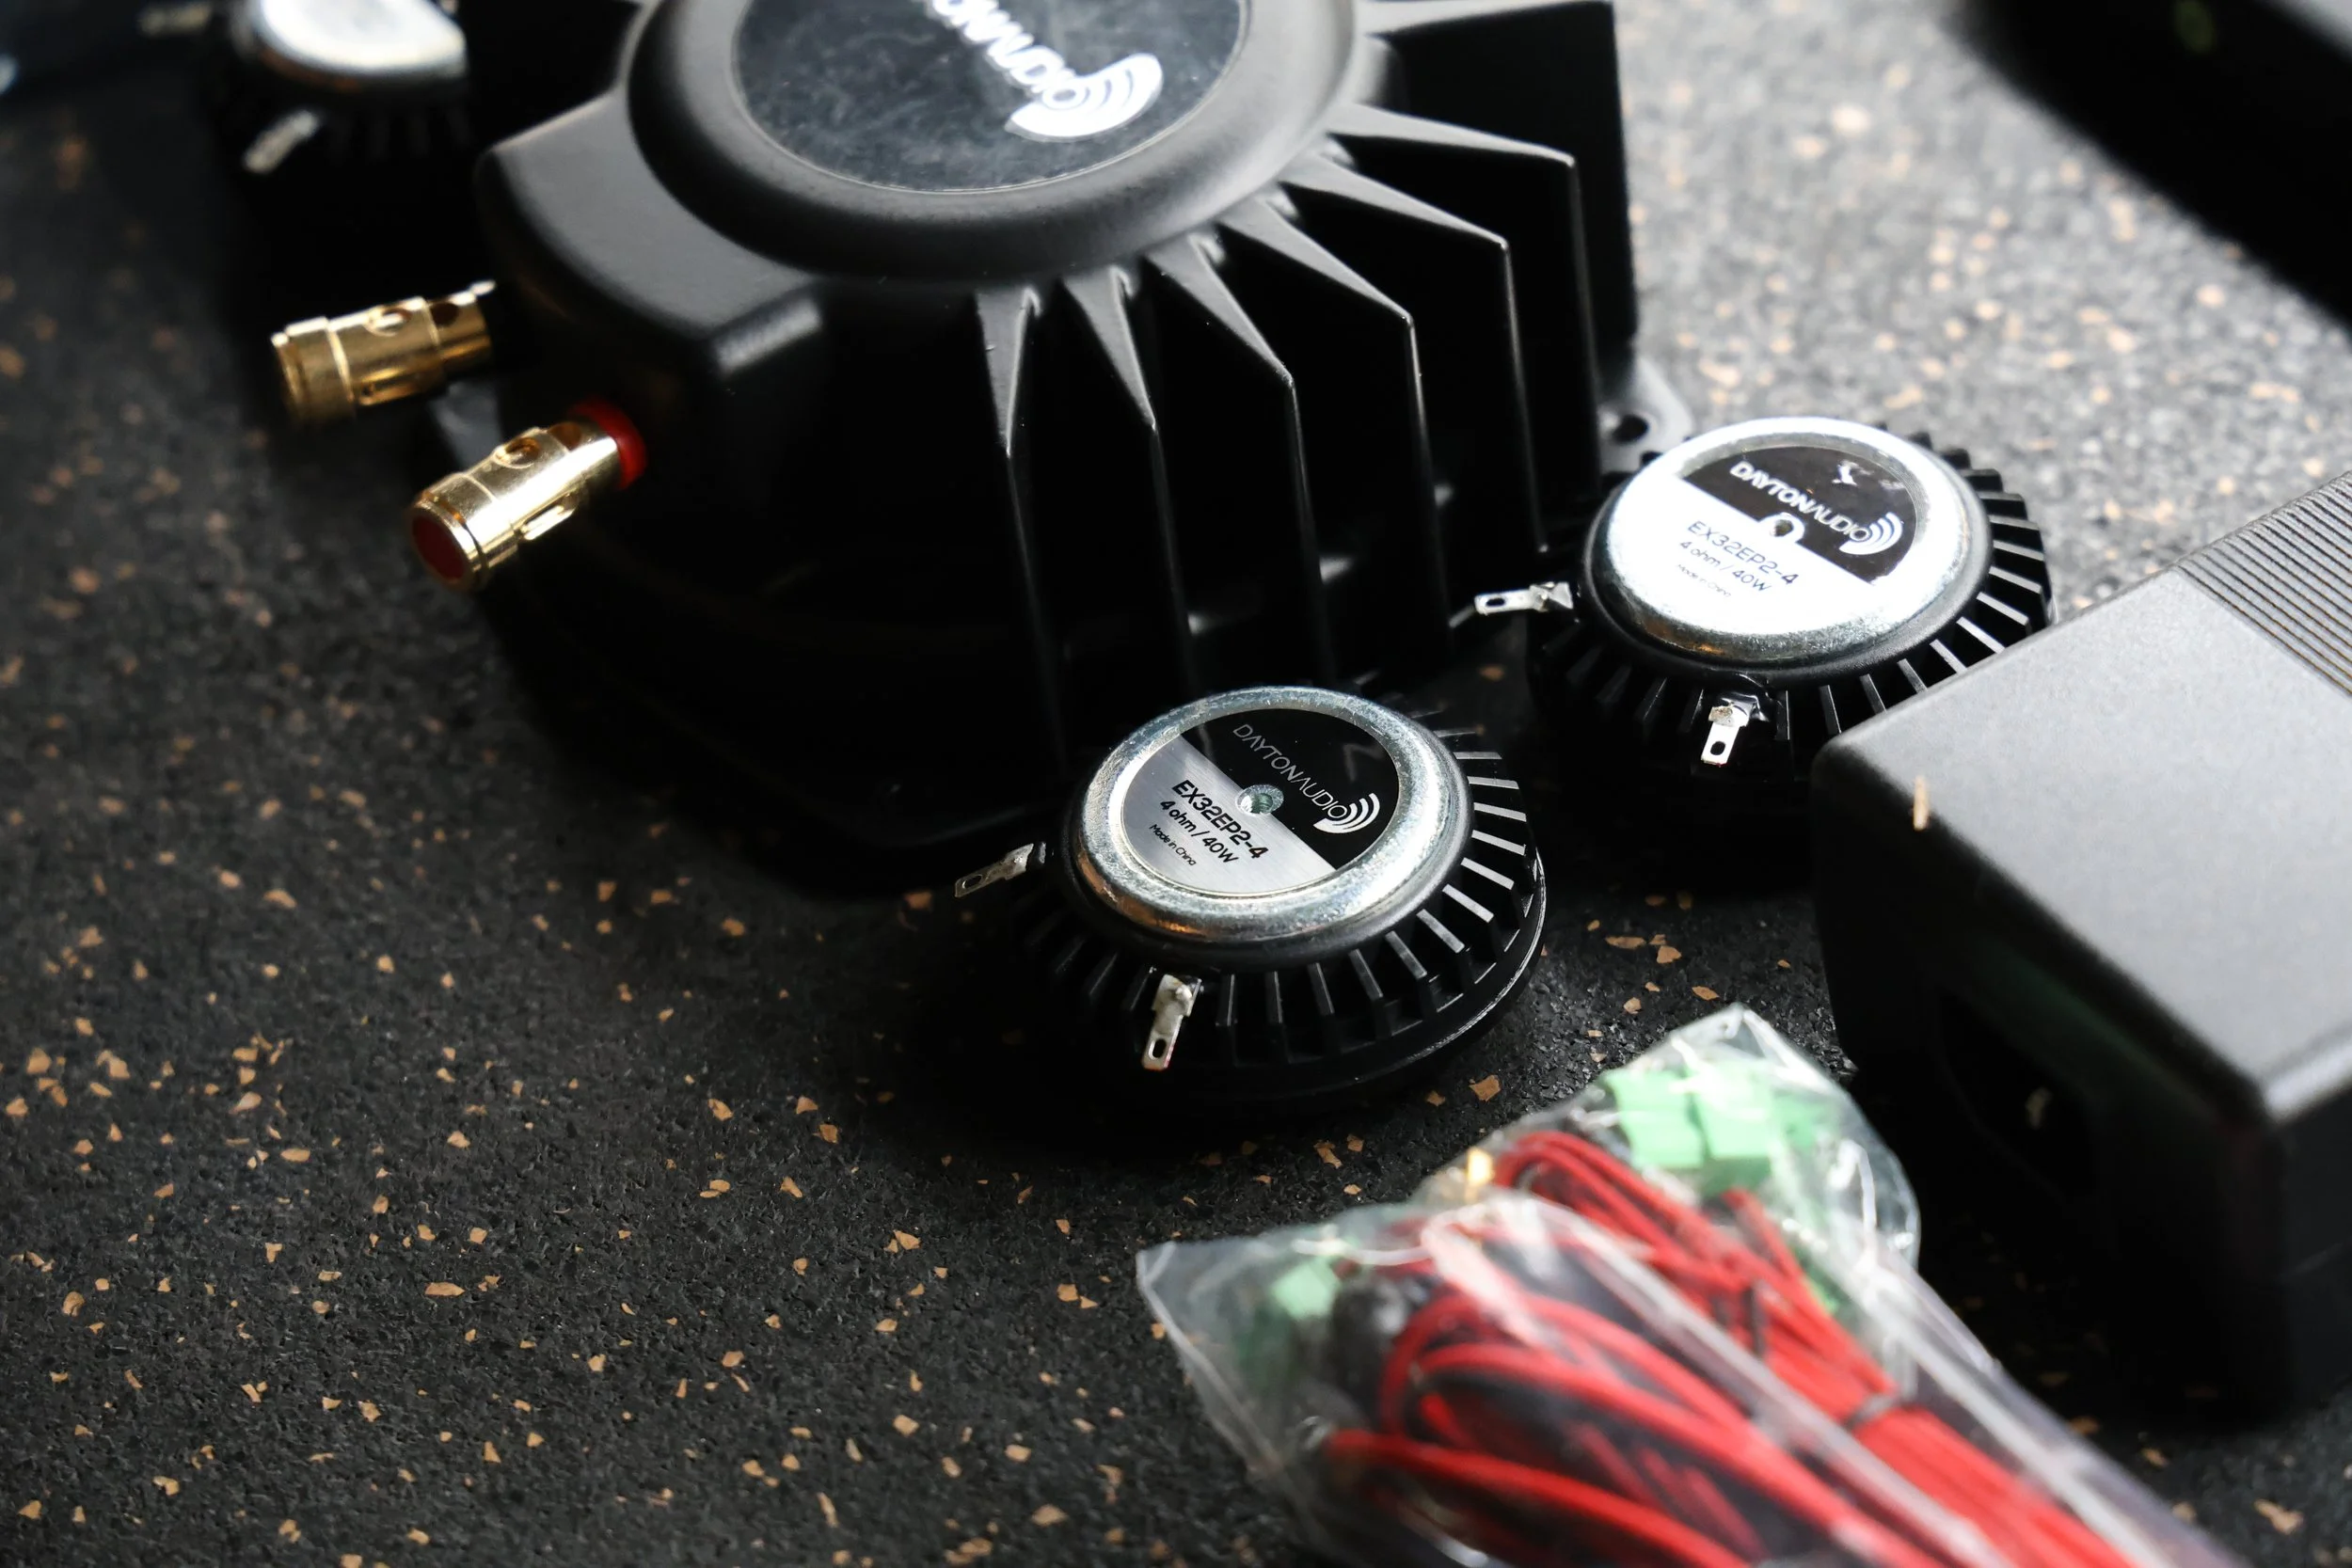
Dayton Audio Exciters (4) EX32EP-4 40 watt 4-ohm
Dayton Audio Bass Shaker (1) BST-1 50 watt
400 Watt Amplifier
7.1 USB Sound Card
Power Supply 24v 12A
Tape, screws, wires, and extra connectors included
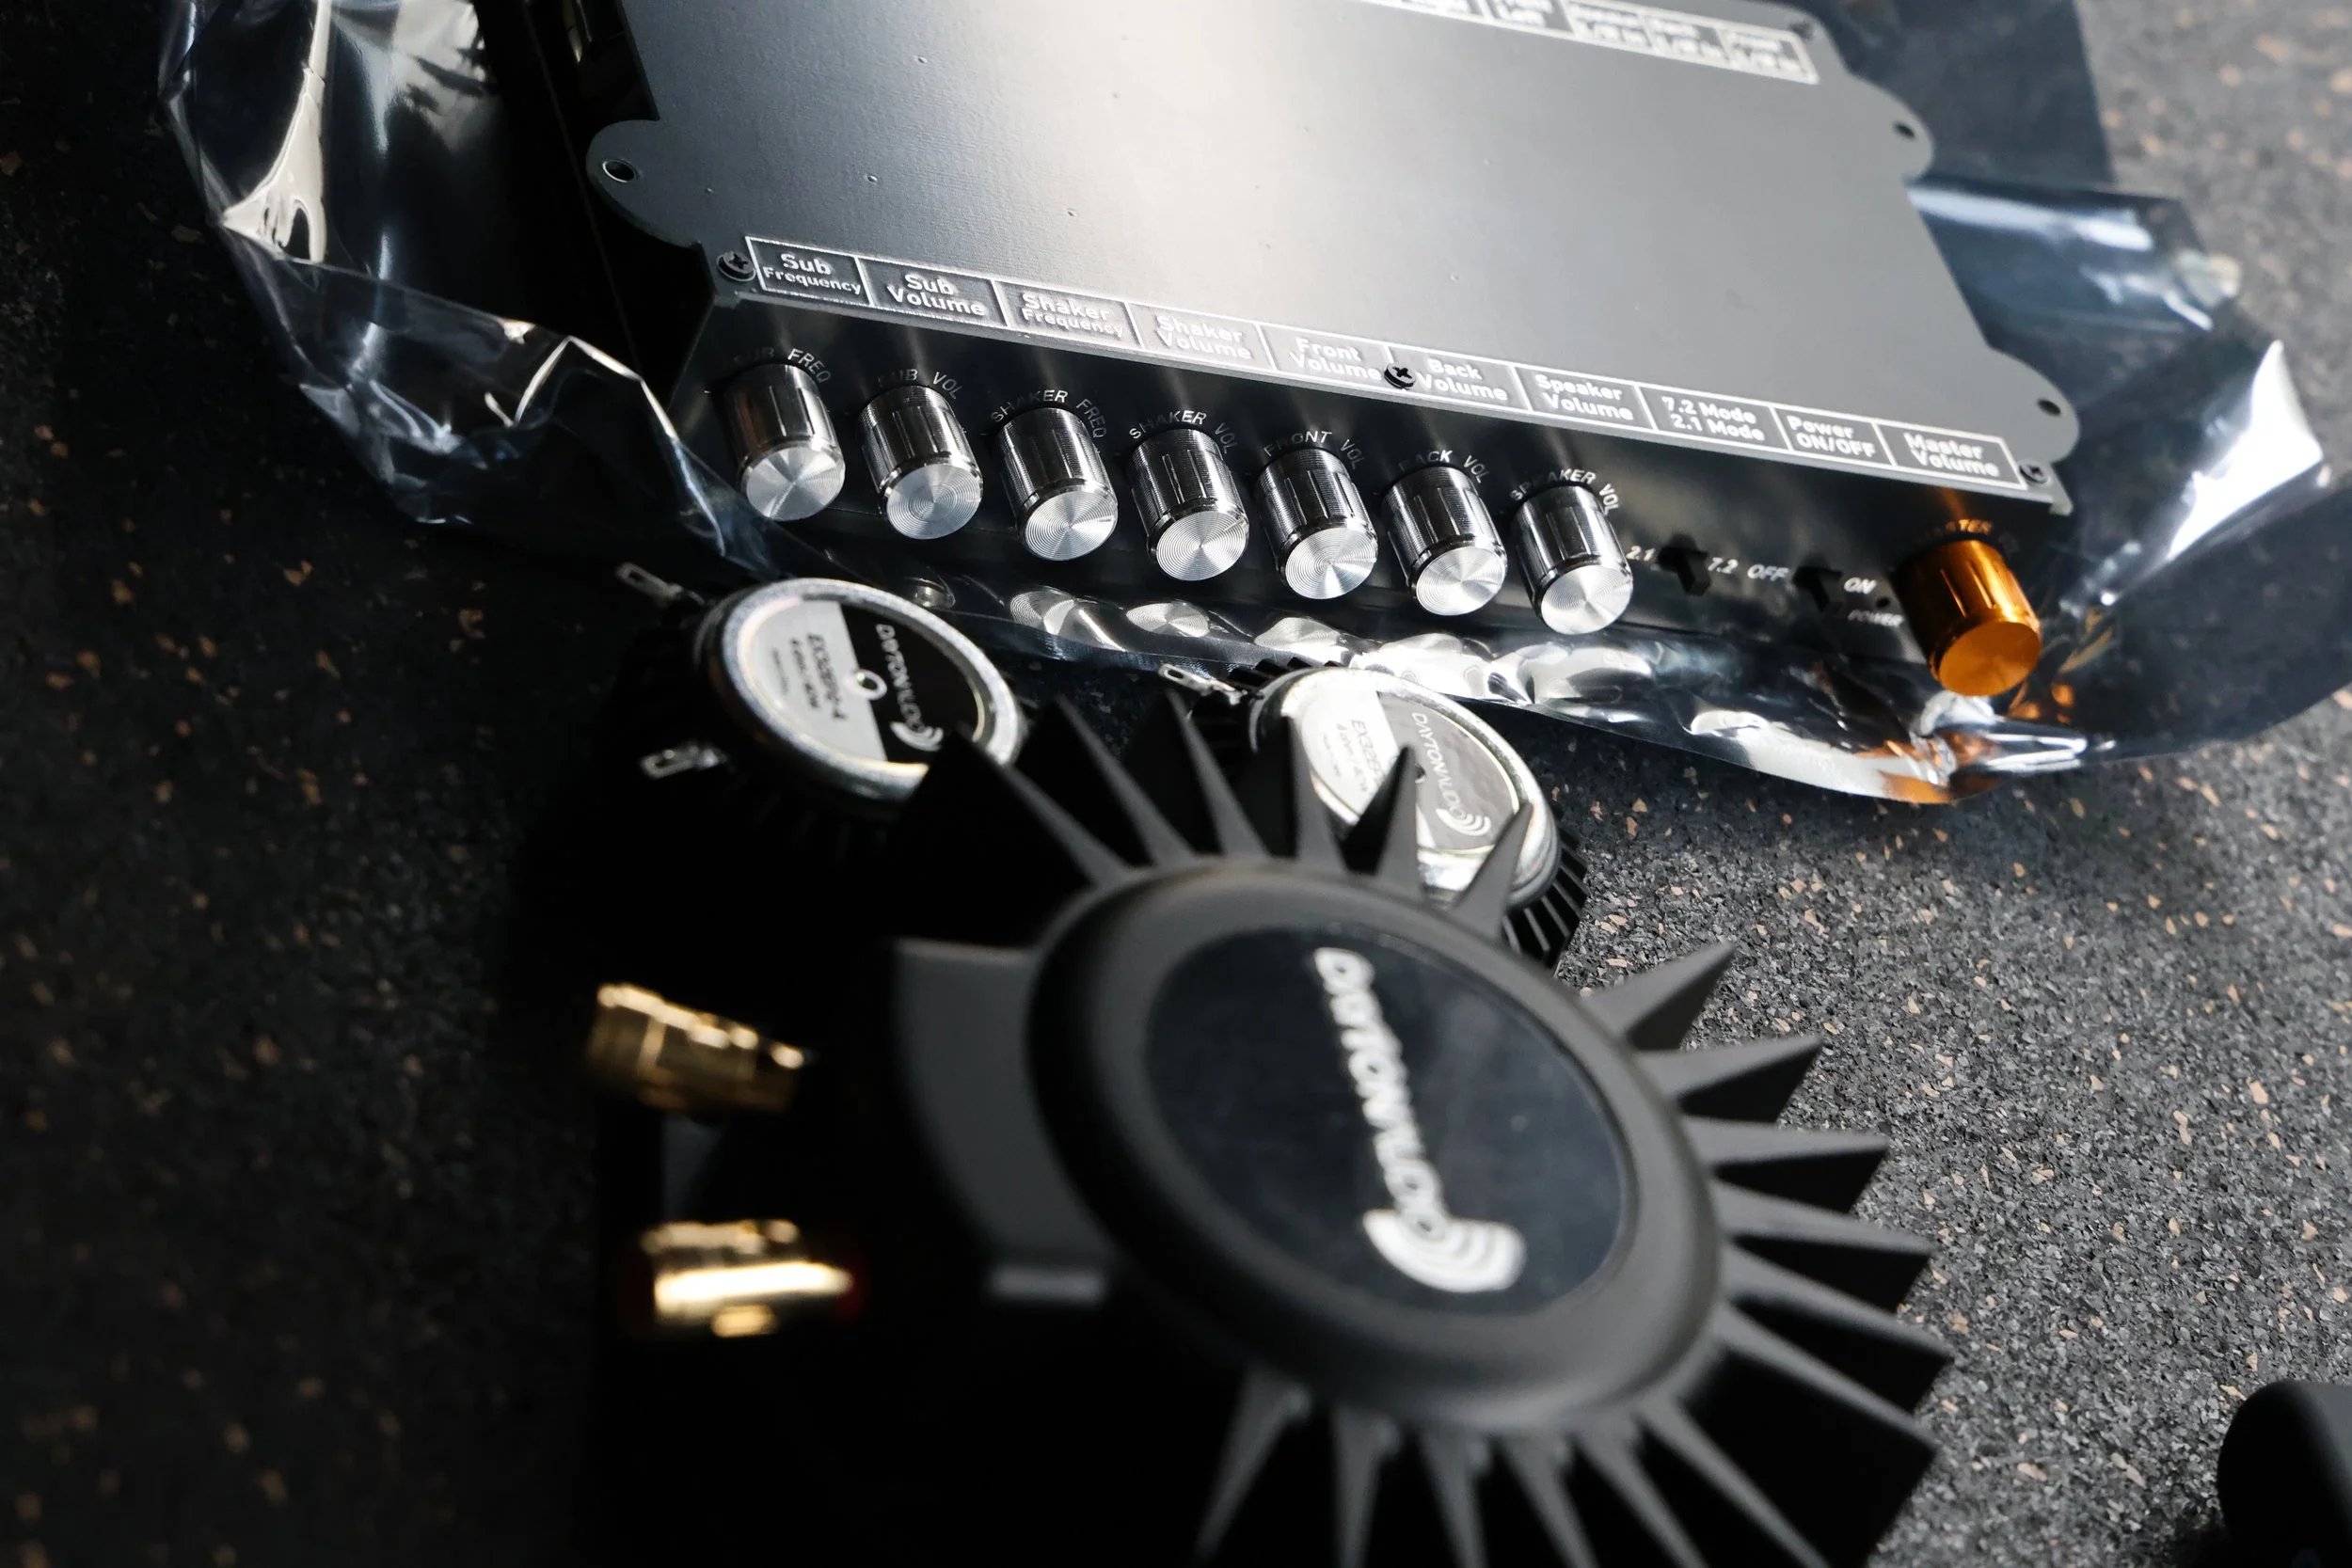
The amplifier is a comprehensive little unit with separate controls for every channel:
Subwoofer low-pass cutoff
Subwoofer volume
Shaker low-pass cutoff
Shaker volume
Front SSF Exciter volume
Back SSF Exciter volume
Front backbox speakers volume
Master volume
Based on the power supply specs, Watts = Volts x Amps, the claimed 400 watt amplifier is questionable. 24V x 12A = 288W.


WHY
Earlier this year I was going to build my own VP cabinet and started to buy the components but found a good deal on a used 4KP Addams Family w/SSF pre-installed. I took the machine apart and noticed that the SSF had small generic unbranded exciters, subwoofer, audio card, and power supply. It was the minimal equipment spec to get the job done; factory style. ATGames is making a killing on the up-charge for this kit!
Since I had the Cleveland kit already, I was simply going to replace the factory exciters with the larger Dayton units.


I noticed that the factory exciters are 8-ohm units and the Dayton is 4-ohm, so if I swapped them out I might stress out that tiny factory amp. This is when I had an AH-HAH moment:
“I wonder if the 4KP’s embedded operating system is just as generic as the components?”
The Cleveland 7.2 audio card looks like a generic model too and might work with the built-in OS drivers. Unlike Windows, where you can go in the Settings and change specific settings, I’ll have no control over how the OS handles this Cleveland card. Here are the possible outcomes:
The OS doesn’t recognize it. No output.
Only a few channels work.
All channels work but are in the wrong order.
All channels work, hooray!
Robot takeover.
I’ve nothing to lose and everything to gain so I disconnected the factory SSF and did a test fit using all of the Cleveland components. Well wouldn’t you know, the ATGames OS recognizes every channel! When running the Sound Check, I’m getting audio from all appropriate channels. WOW, it’s GAME ON!
Here’s an important tidbit about how the factory SSF subwoofer works. From what I can tell, the only thing coming out of that factory sub are thuds, clunks, ball vibrations, and minor audio effects from the SSF system. That said, the backbox audio remains lackluster and plain. This Cleveland SSF Amplifier will support your backbox audio by producing a low-pass subwoofer channel sourced from those 2 backbox channels for a fuller and higher-fidelity sound. The music/effects coming out of the backbox speakers will come alive with the low-end support and totally change your virtual pin experience.
With this setup, the audio that used to be routed to the factory subwoofer is now assigned to the Shaker channel. That Dayton Shaker is no slouch at almost 4lbs! I strongly recommend acoustic treatments to the cabinet because it’ll rattle itself apart. You can see how I applied acoustic treatments in my Audio Upgrade post.
If you are upgrading a factory SSF cabinet, you’ll add the shaker and retain the factory subwoofer to use with the Cleveland amp’s subwoofer channel. Honestly, the factory subwoofer box is made from a potato, it’s better to direct mount an aftermarket subwoofer instead. Check my Audio Upgrade post to see how I did mine.
HOW
Tools:
Phillips screwdriver
Wire cutters
Wire strippers
Needlenose Pliers
Blade
Scissors
Materials:


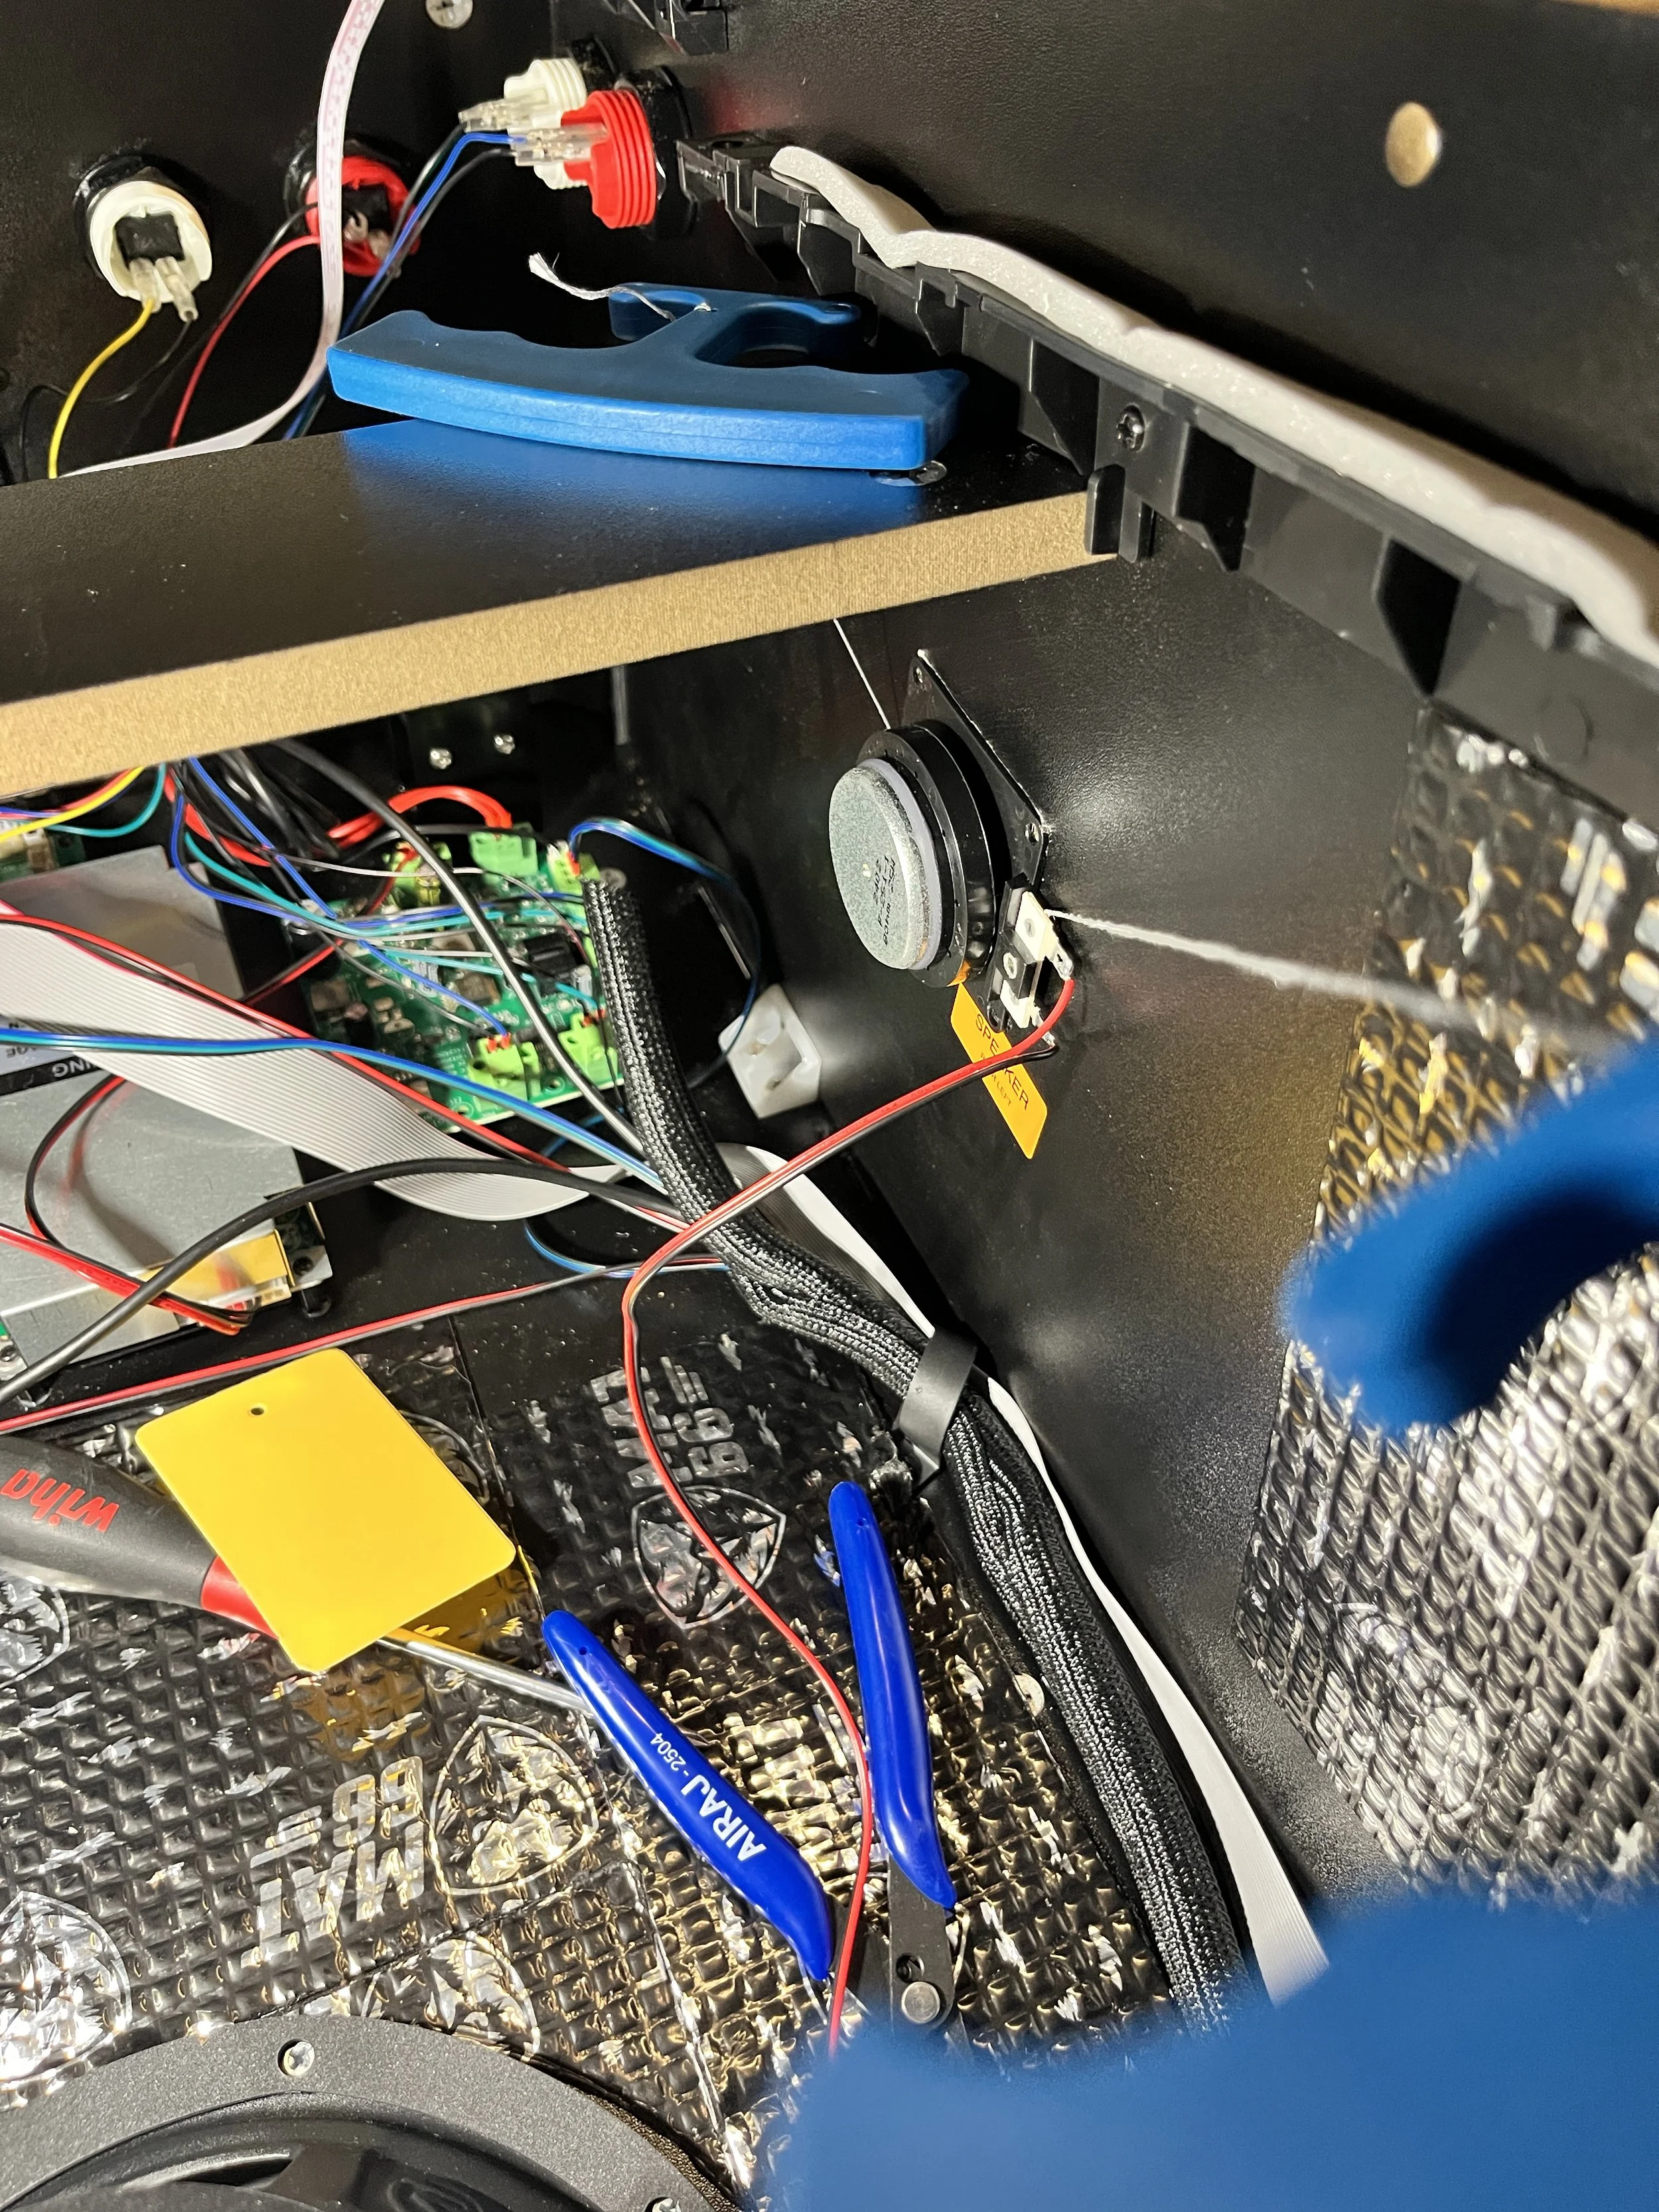
You don’t have to remove the playfield screen to do this but it will make the process easier. There are 2 connectors for the backlighting and a delicate eDP cable. If you intend to add sound dampening sheets at this time, removing the screen is mandatory to reduce the risk of damage.


REMOVE THE INTEGRATED SSF SOUNDCARD/AMP AND POWER SUPPLY
The factory SSF kit installation manual can be found here. Use it for reference as-needed.
The exposed board on the left is the soundcard and amp all-in-one. The box immediately to the right is the SSF power supply. You don’t have to actually remove these components, but for cleanliness sake, I opted to pull them. Plus, it’s the perfect location for the Cleveland parts. As long as the sound card’s USB cable is disconnected, the SSF system is dead.
Disconnect the USB cable going from the mainboard to the integrated soundcard/amp. You may have to use the wire cutters to snip any zip-ties bundling the cables together.
Disconnect the wiring harnesses going from the SSF power supply to the soundcard/amp board.
Disconnect the backbox speaker harness, exciters, and subwoofer connectors from the soundcard/amp board.
Remove the 4 Phillips screws holding the soundcard/amp in place.
Remove the 4 standoffs underneath the soundcard/amp. User pliers to gently loosen the standoffs as needed.
Disconnect the power cable connector attached to the back of the SSF power supply.
Remove the 4 Phillips screws holding the power supply board and metal cover. Note that one of the screws has a yellow grounding cable with a ring connector at the end, that can be moved aside. The metal cover is not secured to the power supply, it’s simply a loose metal cover. When handling the 2 pieces, make sure that the metal shielding does not touch any components on the power supply board.
Remove the 4 standoffs that support the power supply.
REMOVE THE EXCITERS
Remove the 4 screws securing the exciter to the cabinet.
The factory exciters have double sided tape which makes them hard to remove. I pressed a razor blade under the corner and then use the emblem removal tool to saw through the adhesive. Dental floss works just as good to slice through the adhesive. Use a sawing motion to cut through the adhesive.


Additional sound deadening was applied where the factory SSF sound card and power supply was. Simply cut the amount you need, peel/stick, and press into place with the roller.
INSTALL THE NEW EXCITERS AND BASS SHAKER
I used the alcohol prep pads to remove the adhesive remnants and to prep the surface for the new exciters. Peel the backing and stick the new exciter on in place of the old. Leave the speaker cable attached, you’ll have to trim these later and reconnect the green terminal connector.
I mounted the bass shaker in front of the subwoofer. Use the provided 4 screws to secure it onto the board.


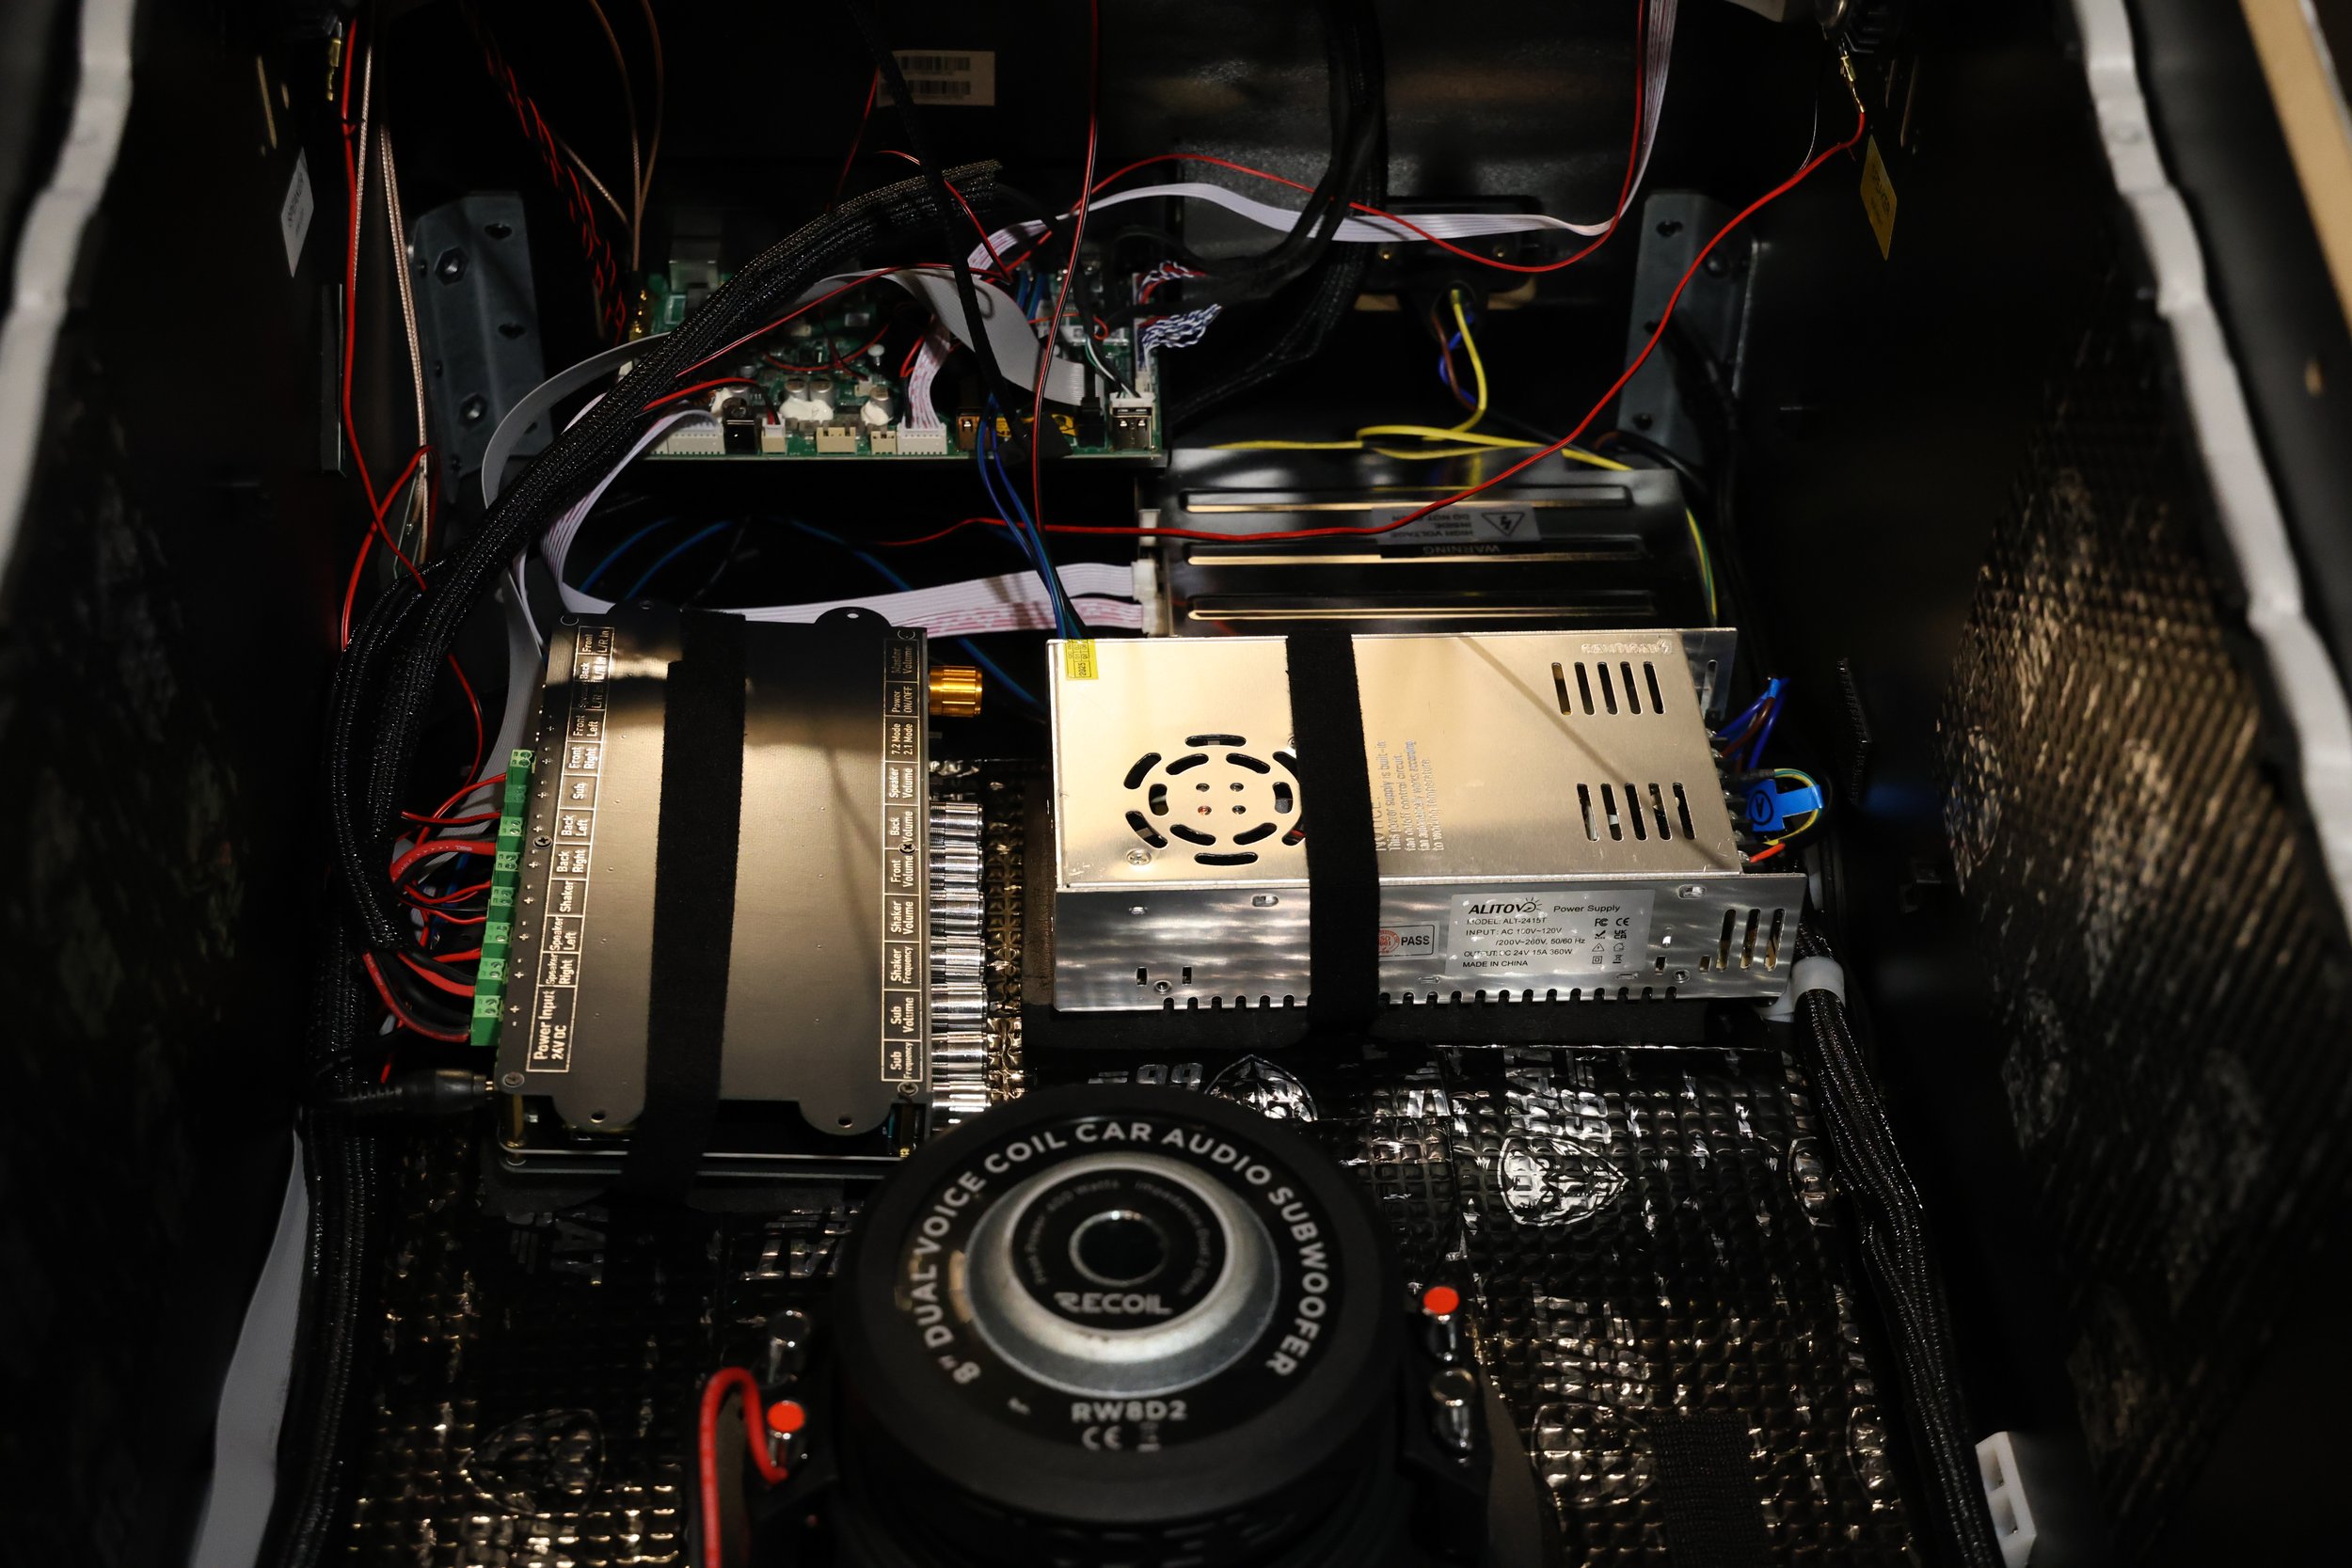
INSTALL THE POWER SUPPLY (PS)
Since the PS is right next to the subwoofer, I isolated it by placing it on top of adhesive backed neoprene foam and secured it in place with a velcro strip.
POWER THE POWER SUPPLY
NOTE: I’m not using the Cleveland power supply. If you do, you can run the power cord out the rear access door or tap into the power wires coming out of the cabinets switch. See below for those 2 wires.
I’m going to use the Brown (Neutral) and Blue (Live) wires that powered the factory SSF kit. The wires have a connector at the end that went into the rear of the factory SSF PS. I’m going to snip the connector off to provide the PS 120v AC. The Yellow ground wire has a ring terminal at the end that fits into the PS’s GND terminal.


INSTALLING THE AMP
Since the amp is in close proximity to the subwoofer, I placed it on top of neoprene foam and used a velcro strap to secure it in place. Make sure that the amp’s channel slider is on 7.2
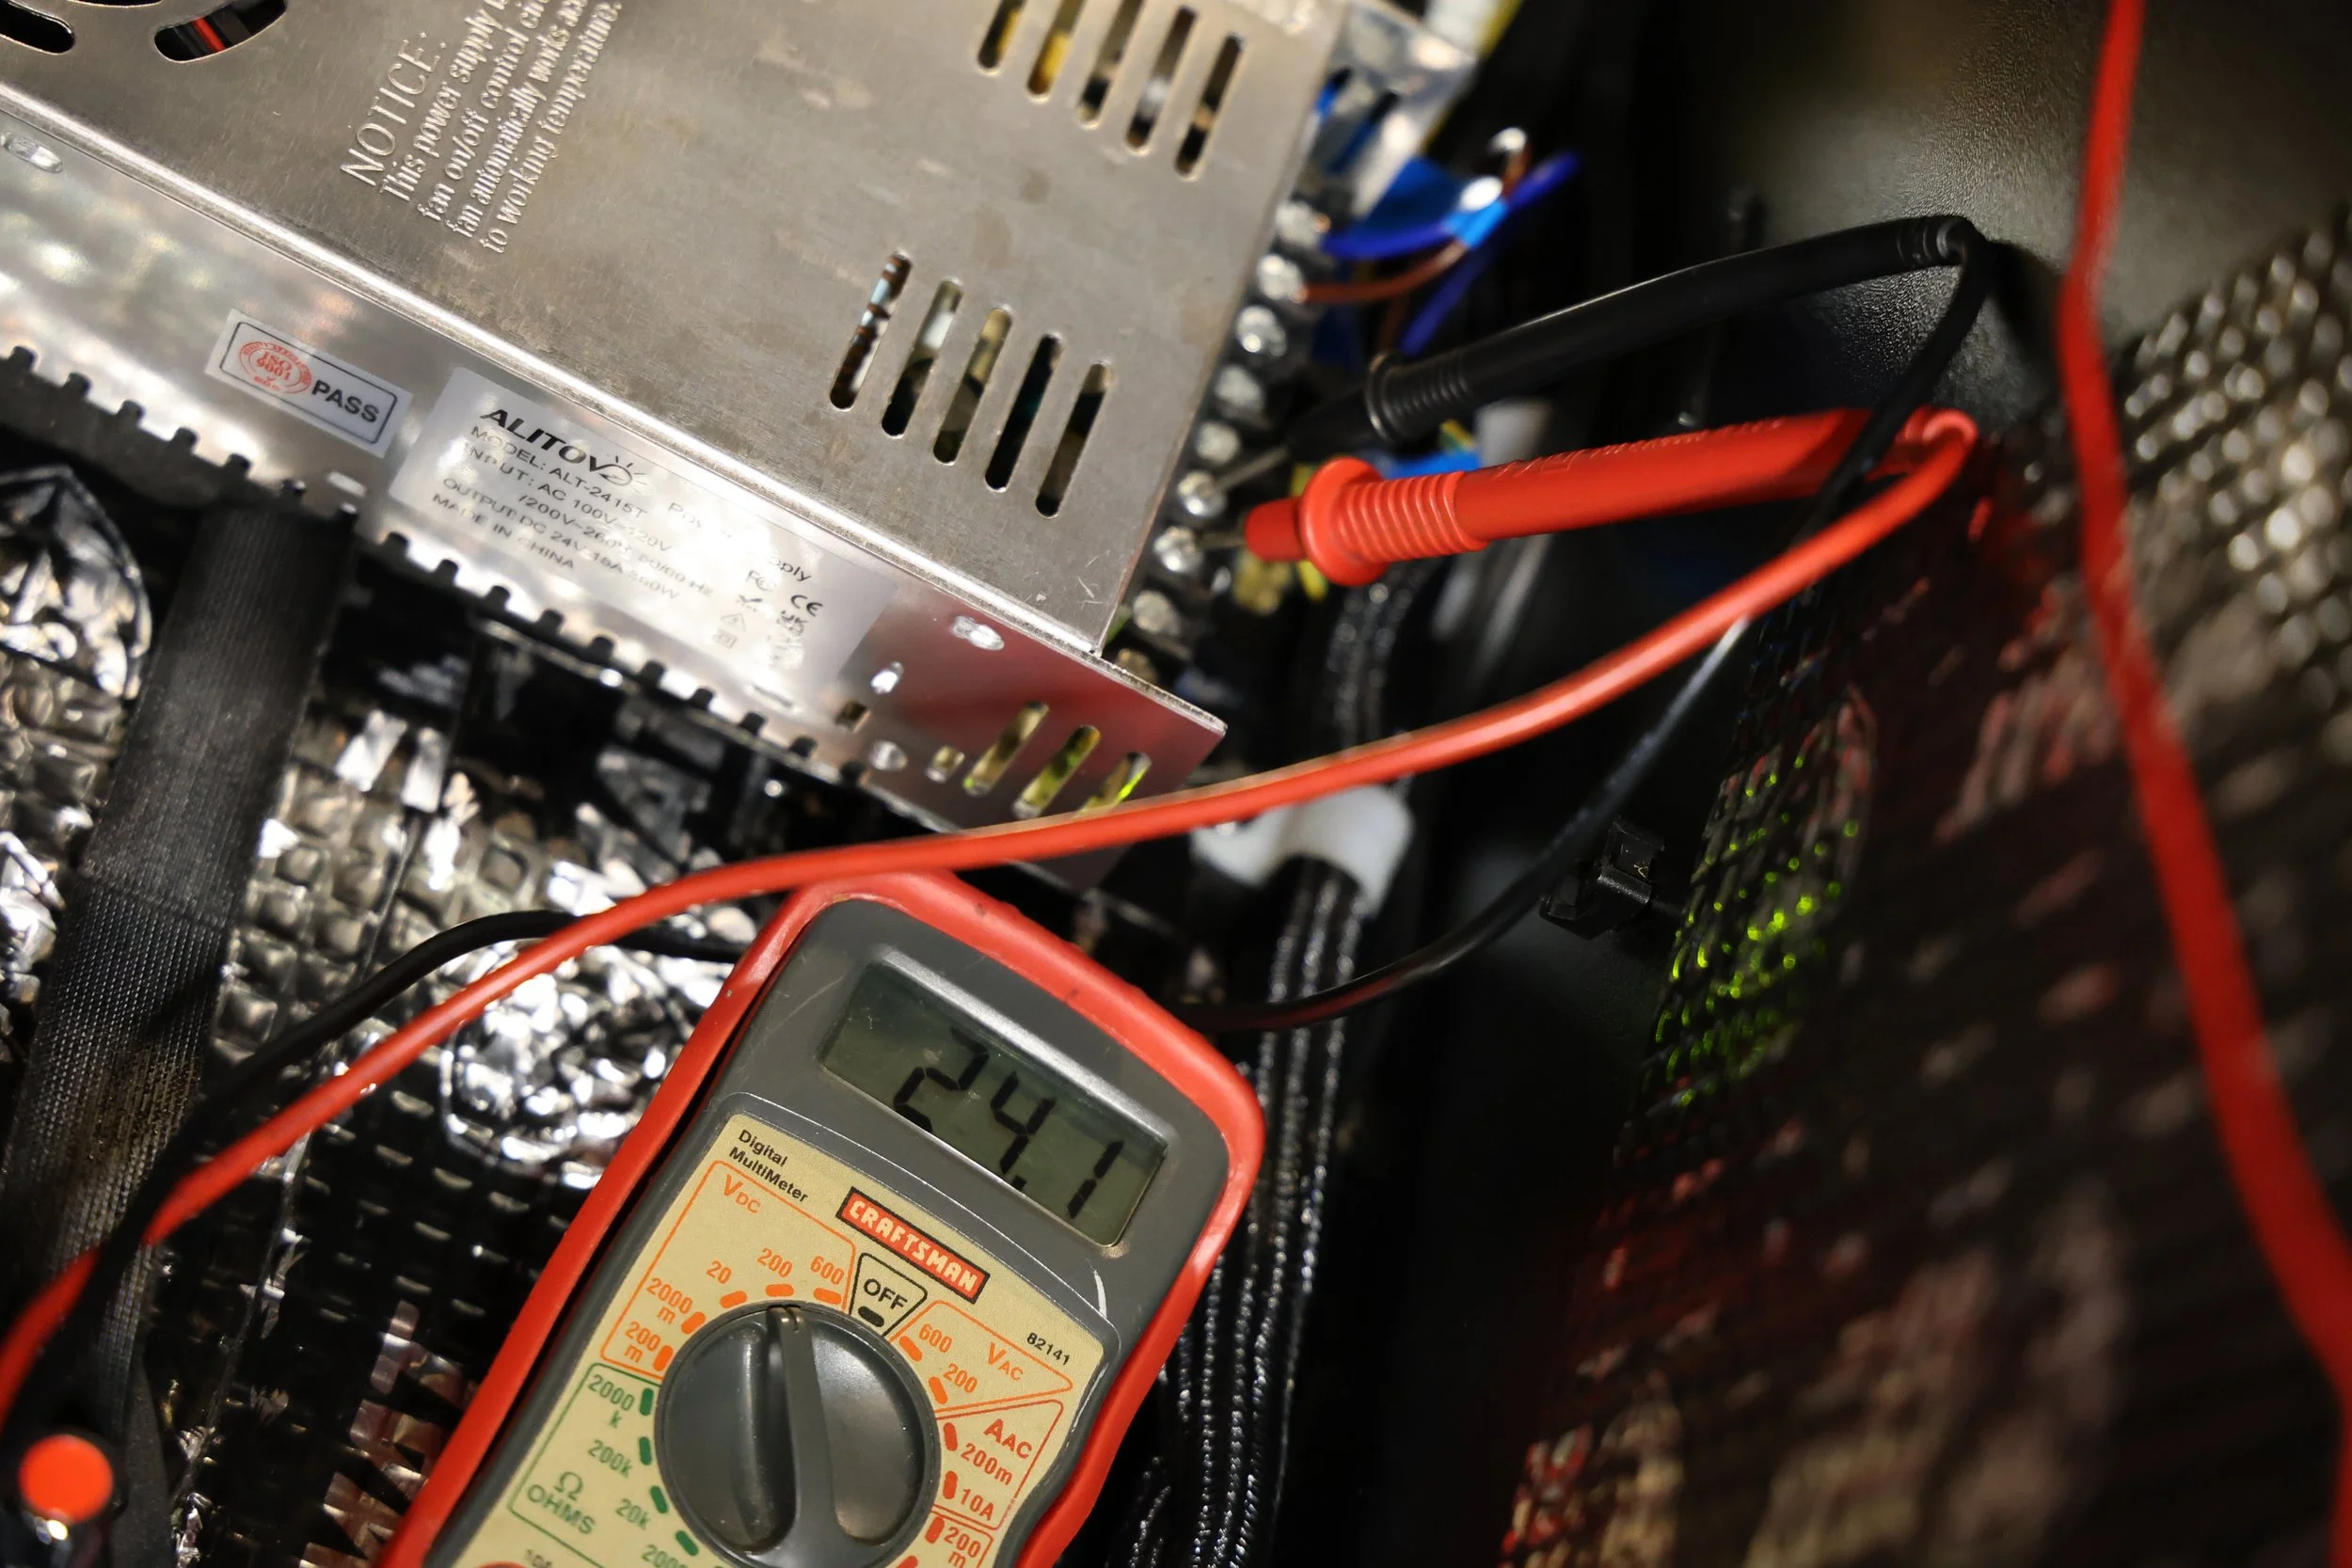
POWERING THE AMP
If you have the means, it’s a good idea to check that the expected voltages are within spec. The multimeter says 24.1V which is good.
I cut a section of wire with the barrel connector off the Cleveland power supply and connected it to the external power supply output. I didn’t know it at the time but in the parts bag there is a green PCB connector for this purpose. I left it as is because I’m a lazy bum.
INSTALL THE SOUNDCARD
I put the soundcard on top of the amp and secured it with the velcro strap.
The soundcard is plugged into and powered by the mainboard’s available usb port via USB-A to USB-B cable.
Connect the appropriate sound card output to the amp’s inputs with the supplied 3.5mm cables (3). It’s ok if you don’t get it right the first time, you can patch the cables to the correct location during testing. The Shaker and Subwoofer signals are produced internally.


CONNECT THE SPEAKERS/EXCITERS/SUBWOOFER/SHAKER
The inside of the Cleveland box has a bag of extra green terminal block connectors. You’ll need these to wire up your backbox speakers and subwoofer connections. The wiring for the exciters and bass shaker is premade. The MAXIMUM size speaker cable that will fit in the connectors is 16-gauge.
CLEANUP
Trim the speaker cables for a custom and clean look and plug them into the appropriate amp channel.
Reconnect your playfield screen but don’t screw it in yet. You can place the screen on top of the cabinet, just a little offset so you can access the internals for any last minute adjustments.

Mostly assembled, ready to test.
TESTING
Plug in the cabinets power cable but do not turn on the unit just yet. FYI - This isn’t an official way (is there even one?) of doing but it’s how I tested the setup.
On the amp, turn all volumes channels to 0%
Turn the low-pass frequency channels to 100%
Take a peek inside the cabinet and do a visual check of the power cables, speaker cables, anything you touched, and see if it’s in place and looks correct.
Take another peek inside the cabinet and see if there are any loose screws or tools laying around. Remove them.
Look inside the cabinet and turn it on. Look for a spark or smoke. If everything still smells good, the audio card will eventually be flashing blue.
Use the volume buttons near the DMD to change your global volume to 50 and the haptics to 50.
Go to Settings and turn on some background music.
Turn the gold Master Volume knob to approximately 50%.
Slowly turn up the Speaker Volume knob until you hear music.
Slowly turn up the Sub Volume knob until you hear the bass.
Go to the SSF menu and set all channels to Moderate.
Go to the Health Check —> Audio test and run it. You are going to let this run the cycle a bunch of times until all of your audio is accounted for. The important test is the front speaker Phase Test. The audio should normally sound like it’s coming from the center when it’s in phase. It should sound hollow and wide if they are out of phase. If the phase is incorrect, pull out the green connector from the amp for the Left channel and simply swap the Positive and Negative. You can do the swap on the actual speaker too.
Turn the Speaker Volume knob to 0%
Turn the Front Volume knob to 50% and wait for the test to run. If the sound is coming from the wrong location, swap the green plugs around until correct. When satisfied, turn this volume to 0%.
Turn the Back Volume knob to 50% and wait for the test to run. Make the appropriate adjustments.
Do the same with the Shaker Volume.
If the sound is coming from all the right places, you can start adjusting all Volume knobs and start lowering the Sub/Shaker low-pass frequency knobs to your liking. This will take a lot of time to find that happy balance.
If you have wire loom, now is the time to install it for that clean look.
Reassemble your cabinet and take a 14 hour nap. You’ll need it.
Ready to rock!
FINAL THOUGHTS
On paper it’s simple because it’s plug and play. The execution is what’s going to get you.
I’ve limited space for a real pinball machine, nor do I have the funds for one, so a virtual machine makes the most sense for this pinball lover. I’m a tinkerer at heart so it’s a real treat trying to modify this machine to be a real as possible with a little bit (or a lot) of exaggeration. As it stands right now, it’s a bass and vibration monster which makes playing pinball a real experience. Perhaps I’ll turn it down later but for now I’m playing it loud. It’s nice to have that kind of flexibility!
My SSF performance baseline is the ATGames SSF kit. The Dayton exciters produce a fuller sound, it’s less tinny than the factory exciters. Ball tracking sounds cleaner once you’ve calibrated your volumes. They also can play much louder if needed. I see how this would be beneficial for cabinets made from various woods. For our 4KP MDF cabs, it’s more than enough.
I’ve upgraded my subwoofer prior to this project and that has singlehandedly made the biggest difference in audio quality. Supporting the backbox speakers with a subwoofer made the system sound so good. That said, the Dayton Bass Shaker has taken the low frequency effects to a new level! The vibrations transmitted through my palms was too much at one point so I had to turn it down. I don’t know if you’ve ever been in an earthquake before but sometimes they are slow and rolling, that’s like a subwoofer. Sometimes they are sharp and jarring, that’s the bass shaker. Having both of those sensations at your disposal has stepped up my low frequency game.
The separate volume controls on the Cleveland amplifier makes calibrating the SSF much easier. Having the ability to adjust the low-pass frequency for the subwoofer and bass shaker is fantastic for a proper tune. The entire unit is so simple and effective which makes it great.
The big question, is it worth spending $400 to upgrade your factory 4KP SSF system? There are 2 situations to consider:
1) If you have the stock factory SSF system, you can reconfigure the existing subwoofer to support the backbox speakers. That alone is a HUGE benefit! I honestly don’t know how good that factory 8” subwoofer is but any additional low-end is good for high-fidelity sound. The overall realism is heightened. If you love pinball, my answer is YES.
2) If you have the base model 4KP, I’d advise you to install a down-firing cheap 8” subwoofer in the hole that they provide in addition to the Cleveland kit. There isn’t much more to say but a resounding YES!
Please feel free to leave a comment. I’d love to hear what you think. Until next time!